RabbitMQ主页:https://www.rabbitmq.com/
AMQP
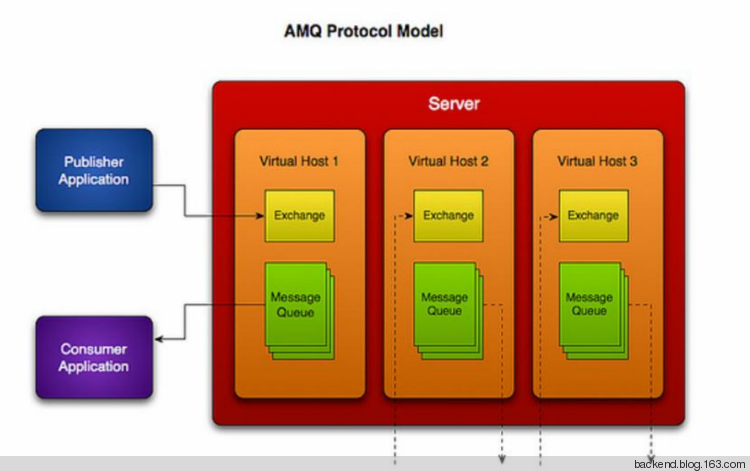
AMQP 协议是一个高级抽象层消息通信协议,RabbitMQ是 AMQP 协议的实现。它主要包括以下组件:
1.Server(broker): 接受客户端连接,实现 AMQP 消息队列和路由功能的进程。
2.Virtual Host:其实是一个虚拟概念,类似于权限控制组,一个 Virtual Host 里面可以有若干个 Exchange 和 Queue,但是权限控制的最小粒度是 Virtual Host
3.Exchange:接受生产者发送的消息,并根据 Binding 规则将消息路由给服务器中的队列。ExchangeType 决定了 Exchange 路由消息的行为,例如,在RabbitMQ中,ExchangeType 有 direct、Fanout 和 Topic 三种,不同类型的 Exchange 路由的行为是不一样的。
4.Message Queue:消息队列,用于存储还未被消费者消费的消息。
5.Message: 由 Header 和 Body 组成,Header 是由生产者添加的各种属性的集合,包括 Message 是否被持久化、由哪个 Message Queue 接受、优先级是多少等。而 Body 是真正需要传输的 APP 数据。
6.Binding:Binding 联系了 Exchange 与 Message Queue。Exchange 在与多个 Message Queue 发生 Binding 后会生成一张路由表,路由表中存储着 Message Queue 所需消息的限制条件即 Binding Key。当 Exchange 收到 Message 时会解析其 Header 得到 Routing Key,Exchange 根据 Routing Key 与 Exchange Type 将 Message 路由到 Message Queue。Binding Key 由 Consumer 在 Binding Exchange 与 Message Queue 时指定,而 Routing Key 由 Producer 发送 Message 时指定,两者的匹配方式由 Exchange Type 决定。
7.Connection:连接,对于RabbitMQ而言,其实就是一个位于客户端和 Broker 之间的 TCP 连接。
8.Channel:信道,仅仅创建了客户端到 Broker 之间的连接后,客户端还是不能发送消息的。需要为每一个 Connection 创建 Channel,AMQP 协议规定只有通过 Channel 才能执行 AMQP 的命令。一个 Connection 可以包含多个 Channel。之所以需要 Channel,是因为 TCP 连接的建立和释放都是十分昂贵的,如果一个客户端每一个线程都需要与 Broker 交互,如果每一个线程都建立一个 TCP 连接,暂且不考虑 TCP 连接是否浪费,就算操作系统也无法承受每秒建立如此多的 TCP 连接。RabbitMQ建议客户端线程之间不要共用 Channel,至少要保证共用 Channel 的线程发送消息必须是串行的,但是建议尽量共用 Connection。
9.Command:AMQP 的命令,客户端通过 Command 完成与 AMQP 服务器的交互来实现自身的逻辑。例如在RabbitMQ中,客户端可以通过 publish 命令发送消息,txSelect 开启一个事务,txCommit 提交一个事务。
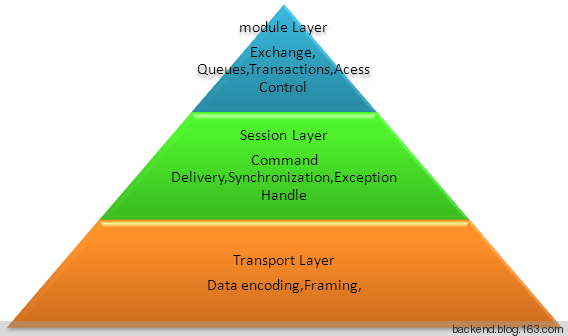
在了解了 AMQP 模型以后,需要简单介绍一下 AMQP 的协议栈,AMQP 协议本身包括三层:
1.Module Layer,位于协议最高层,主要定义了一些供客户端调用的命令,客户端可以利用这些命令实现自己的业务逻辑,例如,客户端可以通过 queue.declare 声明一个队列,利用 consume 命令获取一个队列中的消息。
2.Session Layer,主要负责将客户端的命令发送给服务器,在将服务器端的应答返回给客户端,主要为客户端与服务器之间通信提供可靠性、同步机制和错误处理。
3.Transport Layer,主要传输二进制数据流,提供帧的处理、信道复用、错误检测和数据表示。
RabbitMQ 使用场景
学习 RabbitMQ 的使用场景,来自官方教程:https://www.rabbitmq.com/getstarted.html
场景 1:单发送单接收
使用场景:简单的发送与接收,没有特别的处理。
Producer:
import com.rabbitmq.client.ConnectionFactory;
import com.rabbitmq.client.Connection;
import com.rabbitmq.client.Channel;

public class Send {

  private final static String QUEUE_NAME = "hello";

  public static void main(String[] argv) throws Exception {

    ConnectionFactory factory = new ConnectionFactory();
    factory.setHost("localhost");
    Connection connection = factory.newConnection();
    Channel channel = connection.createChannel();

    channel.queueDeclare(QUEUE_NAME, false, false, false, null);
    String message = "Hello World!";
    channel.basicPublish("", QUEUE_NAME, null, message.getBytes());
    System.out.println(" [x] Sent '" + message + "'");

    channel.close();
    connection.close();
  }
}
Consumer:
import com.rabbitmq.client.ConnectionFactory;
import com.rabbitmq.client.Connection;
import com.rabbitmq.client.Channel;
import com.rabbitmq.client.QueueingConsumer;

public class Recv {

    private final static String QUEUE_NAME = "hello";

    public static void main(String[] argv) throws Exception {

    ConnectionFactory factory = new ConnectionFactory();
    factory.setHost("localhost");
    Connection connection = factory.newConnection();
    Channel channel = connection.createChannel();

    channel.queueDeclare(QUEUE_NAME, false, false, false, null);
    System.out.println(" [*] Waiting for messages. To exit press CTRL+C");

    QueueingConsumer consumer = new QueueingConsumer(channel);
    channel.basicConsume(QUEUE_NAME, true, consumer);

    while (true) {
      QueueingConsumer.Delivery delivery = consumer.nextDelivery();
      String message = new String(delivery.getBody());
      System.out.println(" [x] Received '" + message + "'");
    }
  }
}
场景 2:单发送多接收
使用场景:一个发送端,多个接收端,如分布式的任务派发。为了保证消息发送的可靠性,不丢失消息,使消息持久化了。同时为了防止接收端在处理消息时 down 掉,只有在消息处理完成后才发送 ack 消息。
Producer:
import com.rabbitmq.client.ConnectionFactory;
import com.rabbitmq.client.Connection;
import com.rabbitmq.client.Channel;
import com.rabbitmq.client.MessageProperties;

public class NewTask {

  private static final String TASK_QUEUE_NAME = "task_queue";

  public static void main(String[] argv) throws Exception {

    ConnectionFactory factory = new ConnectionFactory();
    factory.setHost("localhost");
    Connection connection = factory.newConnection();
    Channel channel = connection.createChannel();

    channel.queueDeclare(TASK_QUEUE_NAME, true, false, false, null);

    String message = getMessage(argv);

    channel.basicPublish( "", TASK_QUEUE_NAME,
                MessageProperties.PERSISTENT_TEXT_PLAIN,
                message.getBytes());
    System.out.println(" [x] Sent '" + message + "'");

    channel.close();
    connection.close();
  }

  private static String getMessage(String[] strings){
    if (strings.length < 1)
      return "Hello World!";
    return joinStrings(strings, " ");
  }

  private static String joinStrings(String[] strings, String delimiter) {
    int length = strings.length;
    if (length == 0) return "";
    StringBuilder words = new StringBuilder(strings[0]);
    for (int i = 1; i < length; i++) {
      words.append(delimiter).append(strings[i]);
    }
    return words.toString();
  }
}
发送端和场景 1 不同点:
1、使用“task_queue”声明了另一个 Queue,因为 RabbitMQ 不容许声明 2 个相同名称、配置不同的 Queue
2、使”task_queue”的 Queue 的 durable 的属性为 true,即使消息队列 durable
3、使用 MessageProperties.PERSISTENT_TEXT_PLAIN 使消息 durable
When RabbitMQ quits or crashes it will forget the queues and messages unless you tell it not to. Two things are required to make sure that messages aren’t lost: we need to mark both the queue and messages as durable.
Consumer:
import com.rabbitmq.client.ConnectionFactory;
import com.rabbitmq.client.Connection;
import com.rabbitmq.client.Channel;
import com.rabbitmq.client.QueueingConsumer;

public class Worker {

  private static final String TASK_QUEUE_NAME = "task_queue";

  public static void main(String[] argv) throws Exception {

    ConnectionFactory factory = new ConnectionFactory();
    factory.setHost("localhost");
    Connection connection = factory.newConnection();
    Channel channel = connection.createChannel();

    channel.queueDeclare(TASK_QUEUE_NAME, true, false, false, null);
    System.out.println(" [*] Waiting for messages. To exit press CTRL+C");

    channel.basicQos(1);

    QueueingConsumer consumer = new QueueingConsumer(channel);
    channel.basicConsume(TASK_QUEUE_NAME, false, consumer);

    while (true) {
      QueueingConsumer.Delivery delivery = consumer.nextDelivery();
      String message = new String(delivery.getBody());

      System.out.println(" [x] Received '" + message + "'");
      doWork(message);
      System.out.println(" [x] Done");

      channel.basicAck(delivery.getEnvelope().getDeliveryTag(), false);
    }
  }

  private static void doWork(String task) throws InterruptedException {
    for (char ch: task.toCharArray()) {
      if (ch == '.') Thread.sleep(1000);
    }
  }
}
接收端和场景 1 不同点:
1、使用“task_queue”声明消息队列,并使消息队列 durable
2、在使用 channel.basicConsume 接收消息时使 autoAck 为 false,即不自动会发 ack,由 channel.basicAck()在消息处理完成后发送消息。
3、使用了 channel.basicQos(1)保证在接收端一个消息没有处理完时不会接收另一个消息,即接收端发送了 ack 后才会接收下一个消息。在这种情况下发送端会尝试把消息发送给下一个 not busy 的接收端。
注意点:
1)It’s a common mistake to miss the basicAck. It’s an easy error, but the consequences are serious. Messages will be redelivered when your client quits (which may look like random redelivery), but RabbitMQ will eat more and more memory as it won’t be able to release any unacked messages.
2)Note on message persistence
Marking messages as persistent doesn’t fully guarantee that a message won’t be lost. Although it tells RabbitMQ to save the message to disk, there is still a short time window when RabbitMQ has accepted a message and hasn’t saved it yet. Also, RabbitMQ doesn’t do fsync(2) for every message — it may be just saved to cache and not really written to the disk. The persistence guarantees aren’t strong, but it’s more than enough for our simple task queue. If you need a stronger guarantee you can wrap the publishing code in atransaction.
3)Note about queue size
If all the workers are busy, your queue can fill up. You will want to keep an eye on that, and maybe add more workers, or have some other strategy.
4)RabbitMQ allows you to set Time To Live for both messages and queues. https://www.rabbitmq.com/ttl.html
场景 3:Publish/Subscribe
使用场景:发布、订阅模式,发送端发送广播消息,多个接收端接收。
Producer:
import com.rabbitmq.client.ConnectionFactory;
import com.rabbitmq.client.Connection;
import com.rabbitmq.client.Channel;

public class EmitLog {

  private static final String EXCHANGE_NAME = "logs";

  public static void main(String[] argv) throws Exception {

    ConnectionFactory factory = new ConnectionFactory();
    factory.setHost("localhost");
    Connection connection = factory.newConnection();
    Channel channel = connection.createChannel();

    channel.exchangeDeclare(EXCHANGE_NAME, "fanout");

    String message = getMessage(argv);

    channel.basicPublish(EXCHANGE_NAME, "", null, message.getBytes());
    System.out.println(" [x] Sent '" + message + "'");

    channel.close();
    connection.close();
  }

  private static String getMessage(String[] strings){
    if (strings.length < 1)
            return "info: Hello World!";
    return joinStrings(strings, " ");
  }

  private static String joinStrings(String[] strings, String delimiter) {
    int length = strings.length;
    if (length == 0) return "";
    StringBuilder words = new StringBuilder(strings[0]);
    for (int i = 1; i < length; i++) {
        words.append(delimiter).append(strings[i]);
    }
    return words.toString();
  }
}
发送端:
发送消息到一个名为“logs”的 exchange 上,使用“fanout”方式发送,即广播消息,不需要使用 queue,发送端不需要关心谁接收。
Consumer:
import com.rabbitmq.client.ConnectionFactory;
import com.rabbitmq.client.Connection;
import com.rabbitmq.client.Channel;
import com.rabbitmq.client.QueueingConsumer;

public class ReceiveLogs {

  private static final String EXCHANGE_NAME = "logs";

  public static void main(String[] argv) throws Exception {

    ConnectionFactory factory = new ConnectionFactory();
    factory.setHost("localhost");
    Connection connection = factory.newConnection();
    Channel channel = connection.createChannel();

    channel.exchangeDeclare(EXCHANGE_NAME, "fanout");
    String queueName = channel.queueDeclare().getQueue();
    channel.queueBind(queueName, EXCHANGE_NAME, "");

    System.out.println(" [*] Waiting for messages. To exit press CTRL+C");

    QueueingConsumer consumer = new QueueingConsumer(channel);
    channel.basicConsume(queueName, true, consumer);

    while (true) {
      QueueingConsumer.Delivery delivery = consumer.nextDelivery();
      String message = new String(delivery.getBody());

      System.out.println(" [x] Received '" + message + "'");
    }
  }
}
接收端:
1、声明名为“logs”的 exchange 的,方式为”fanout”,和发送端一样。
2、channel.queueDeclare().getQueue();该语句得到一个随机名称的 Queue,该 queue 的类型为 non-durable、exclusive、auto-delete 的,将该 queue 绑定到上面的 exchange 上接收消息。
3、注意 binding queue 的时候,channel.queueBind()的第三个参数 Routing key 为空,即所有的消息都接收。如果这个值不为空,在 exchange type 为“fanout”方式下该值被忽略!
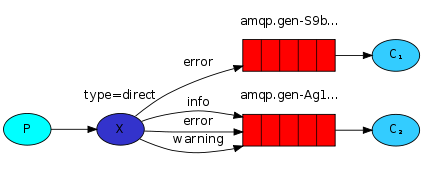
场景 4:Routing (按路线发送接收)
使用场景:发送端按 routing key 发送消息,不同的接收端按不同的 routing key 接收消息。
Producer:
import com.rabbitmq.client.ConnectionFactory;
import com.rabbitmq.client.Connection;
import com.rabbitmq.client.Channel;

public class EmitLogDirect {

  private static final String EXCHANGE_NAME = "direct_logs";

  public static void main(String[] argv) throws Exception {

    ConnectionFactory factory = new ConnectionFactory();
    factory.setHost("localhost");
    Connection connection = factory.newConnection();
    Channel channel = connection.createChannel();

    channel.exchangeDeclare(EXCHANGE_NAME, "direct");

    String severity = getSeverity(argv);
    String message = getMessage(argv);

    channel.basicPublish(EXCHANGE_NAME, severity, null, message.getBytes());
    System.out.println(" [x] Sent '" + severity + "':'" + message + "'");

    channel.close();
    connection.close();
  }

  private static String getSeverity(String[] strings){
    if (strings.length < 1)
            return "info";
    return strings[0];
  }

  private static String getMessage(String[] strings){
    if (strings.length < 2)
            return "Hello World!";
    return joinStrings(strings, " ", 1);
  }

  private static String joinStrings(String[] strings, String delimiter, int startIndex) {
    int length = strings.length;
    if (length == 0 ) return "";
    if (length < startIndex ) return "";
    StringBuilder words = new StringBuilder(strings[startIndex]);
    for (int i = startIndex + 1; i < length; i++) {
        words.append(delimiter).append(strings[i]);
    }
    return words.toString();
  }
}
发送端和场景 3 的区别:
1、exchange 的 type 为 direct
2、发送消息的时候加入了 routing key
Consumer:
import com.rabbitmq.client.ConnectionFactory;
import com.rabbitmq.client.Connection;
import com.rabbitmq.client.Channel;
import com.rabbitmq.client.QueueingConsumer;

public class ReceiveLogsDirect {

  private static final String EXCHANGE_NAME = "direct_logs";

  public static void main(String[] argv) throws Exception {

    ConnectionFactory factory = new ConnectionFactory();
    factory.setHost("localhost");
    Connection connection = factory.newConnection();
    Channel channel = connection.createChannel();

    channel.exchangeDeclare(EXCHANGE_NAME, "direct");
    String queueName = channel.queueDeclare().getQueue();

    if (argv.length < 1){
      System.err.println("Usage: ReceiveLogsDirect [info] [warning] [error]");
      System.exit(1);
    }

    for(String severity : argv){
      channel.queueBind(queueName, EXCHANGE_NAME, severity);
    }

    System.out.println(" [*] Waiting for messages. To exit press CTRL+C");

    QueueingConsumer consumer = new QueueingConsumer(channel);
    channel.basicConsume(queueName, true, consumer);

    while (true) {
      QueueingConsumer.Delivery delivery = consumer.nextDelivery();
      String message = new String(delivery.getBody());
      String routingKey = delivery.getEnvelope().getRoutingKey();

      System.out.println(" [x] Received '" + routingKey + "':'" + message + "'");
    }
  }
}
接收端和场景 3 的区别:
在绑定 queue 和 exchange 的时候使用了 routing key,即从该 exchange 上只接收 routing key 指定的消息。
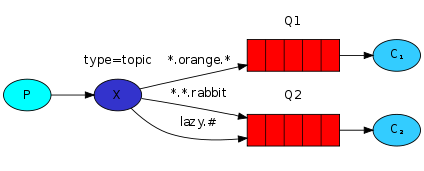
场景 5:Topics (按 topic 发送接收)
使用场景:发送端不只按固定的 routing key 发送消息,而是按字符串“匹配”发送,接收端同样如此。
Producer:
import com.rabbitmq.client.ConnectionFactory;
import com.rabbitmq.client.Connection;
import com.rabbitmq.client.Channel;

public class EmitLogTopic {

  private static final String EXCHANGE_NAME = "topic_logs";

  public static void main(String[] argv) {
    Connection connection = null;
    Channel channel = null;
    try {
      ConnectionFactory factory = new ConnectionFactory();
      factory.setHost("localhost");

      connection = factory.newConnection();
      channel = connection.createChannel();

      channel.exchangeDeclare(EXCHANGE_NAME, "topic");

      String routingKey = getRouting(argv);
      String message = getMessage(argv);

      channel.basicPublish(EXCHANGE_NAME, routingKey, null, message.getBytes());
      System.out.println(" [x] Sent '" + routingKey + "':'" + message + "'");

    }
    catch  (Exception e) {
      e.printStackTrace();
    }
    finally {
      if (connection != null) {
        try {
          connection.close();
        }
        catch (Exception ignore) {}
      }
    }
  }

  private static String getRouting(String[] strings){
    if (strings.length < 1)
            return "anonymous.info";
    return strings[0];
  }

  private static String getMessage(String[] strings){
    if (strings.length < 2)
            return "Hello World!";
    return joinStrings(strings, " ", 1);
  }

  private static String joinStrings(String[] strings, String delimiter, int startIndex) {
    int length = strings.length;
    if (length == 0 ) return "";
    if (length < startIndex ) return "";
    StringBuilder words = new StringBuilder(strings[startIndex]);
    for (int i = startIndex + 1; i < length; i++) {
        words.append(delimiter).append(strings[i]);
    }
    return words.toString();
  }
}
发送端和场景 4 的区别:
1、exchange 的 type 为 topic
2、发送消息的 routing key 不是固定的单词,而是匹配字符串,如”*.lu.#”,*匹配一个单词,#匹配 0 个或多个单词。
Consumer:
import com.rabbitmq.client.ConnectionFactory;
import com.rabbitmq.client.Connection;
import com.rabbitmq.client.Channel;
import com.rabbitmq.client.QueueingConsumer;

public class ReceiveLogsTopic {

  private static final String EXCHANGE_NAME = "topic_logs";

  public static void main(String[] argv) {
    Connection connection = null;
    Channel channel = null;
    try {
      ConnectionFactory factory = new ConnectionFactory();
      factory.setHost("localhost");

      connection = factory.newConnection();
      channel = connection.createChannel();

      channel.exchangeDeclare(EXCHANGE_NAME, "topic");
      String queueName = channel.queueDeclare().getQueue();

      if (argv.length < 1){
        System.err.println("Usage: ReceiveLogsTopic [binding_key]...");
        System.exit(1);
      }

      for(String bindingKey : argv){
        channel.queueBind(queueName, EXCHANGE_NAME, bindingKey);
      }

      System.out.println(" [*] Waiting for messages. To exit press CTRL+C");

      QueueingConsumer consumer = new QueueingConsumer(channel);
      channel.basicConsume(queueName, true, consumer);

      while (true) {
        QueueingConsumer.Delivery delivery = consumer.nextDelivery();
        String message = new String(delivery.getBody());
        String routingKey = delivery.getEnvelope().getRoutingKey();

        System.out.println(" [x] Received '" + routingKey + "':'" + message + "'");
      }
    }
    catch  (Exception e) {
      e.printStackTrace();
    }
    finally {
      if (connection != null) {
        try {
          connection.close();
        }
        catch (Exception ignore) {}
      }
    }
  }
}
接收端和场景 4 的区别:
1、exchange 的 type 为 topic
2、接收消息的 routing key 不是固定的单词,而是匹配字符串。
注意点:
Topic exchange
Topic exchange is powerful and can behave like other exchanges. When a queue is bound with “#” (hash) binding key – it will receive all the messages, regardless of the routing key – like in fanout exchange. When special characters “*” (star) and “#” (hash) aren’t used in bindings, the topic exchange will behave just like a direct one.
About queue:
1 queue-name
The queue name MAY be empty, in which case the server MUST create a new queue with a unique generated name and return this to the client in the Declare-Ok method.
2 passive
If set, the server will reply with Declare-Ok if the queue already exists with the same name, and raise an error if not.
3 durable
If set when creating a new queue, the queue will be marked as durable. Durable queues remain active when a server restarts. Non-durable queues (transient queues) are purged if/when a server restarts. Note that durable queues do not necessarily hold persistent messages, although it does not make sense to send persistent messages to a transient queue.
The server MUST recreate the durable queue after a restart.
The server MUST support both durable and transient queues.
4 exclusive
Exclusive queues may only be accessed by the current connection, and are deleted when that connection closes. Passive declaration of an exclusive queue by other connections are not allowed.
The server MUST support both exclusive (private) and non-exclusive (shared) queues.
The client MAY NOT attempt to use a queue that was declared as exclusive by another still-open connection. Error code: resource-locked
5 auto-delete
If set, the queue is deleted when all consumers have finished using it. The last consumer can be cancelled either explicitly or because its channel is closed. If there was no consumer ever on the queue, it won’t be deleted. Applications can explicitly delete auto-delete queues using the Delete method as normal.
The server MUST ignore the auto-delete field if the queue already exists.
About exchange:
1 passive
If set, the server will reply with Declare-Ok if the exchange already exists with the same name, and raise an error if not.
2 durable
If set when creating a new exchange, the exchange will be marked as durable. Durable exchanges remain active when a server restarts. Non-durable exchanges (transient exchanges) are purged if/when a server restarts.
3 auto-delete
If set, the exchange is deleted when all queues have finished using it.
The server SHOULD allow for a reasonable delay between the point when it determines that an exchange is not being used (or no longer used), and the point when it deletes the exchange. At the least it must allow a client to create an exchange and then bind a queue to it, with a small but non-zero delay between these two actions.
The server MUST ignore the auto-delete field if the exchange already exists.
4 internal
If set, the exchange may not be used directly by publishers, but only when bound to other exchanges. Internal exchanges are used to construct wiring that is not visible to applications.
参考:
https://www.rabbitmq.com/getstarted.html
http://www.rabbitmq.com/amqp-0-9-1-reference.html#queue.declare.exclusive
https://www.rabbitmq.com/ttl.html
http://backend.blog.163.com/blog/static/202294126201322215551999/

